Find Location From a Photo

Find a location from a photo online with a free Surface scan. Upload a JPG, PNG, or WebP, then check the suggested place against the scene. No GPS or EXIF tags are needed.

Want to see a real result first?
No GPS or EXIF required/Free surface scan/Evidence workspace/How it works

What can you verify before paying?

Run a free Surface scan on this page without signing up. Compare its suggested place with the signs, buildings and road layout in your photo. A map pin is a hypothesis; keep it unconfirmed until the scene agrees.

1. Check the original file

If you have the original photo, check its GPS tags first. Screenshots and shared images may have lost them. Tags can also be edited, so compare them with the scene.

2. Look for a contradiction

Check a readable sign, a road junction and the neighboring buildings together. A different facade or road alignment can rule out a plausible-looking result.

3. Decide whether to go deeper

A detailed D3 analysis uses 10 credits to investigate further. It can still be inconclusive, especially with dark scenes, generic interiors or tight crops. Paying does not guarantee an exact address.

Starter includes 30 credits for $10/month; Pro includes 100 for $29/month. One-time credit packs are also available. Compare plans and credit packs before choosing.

Find a location from a photo, then test the match

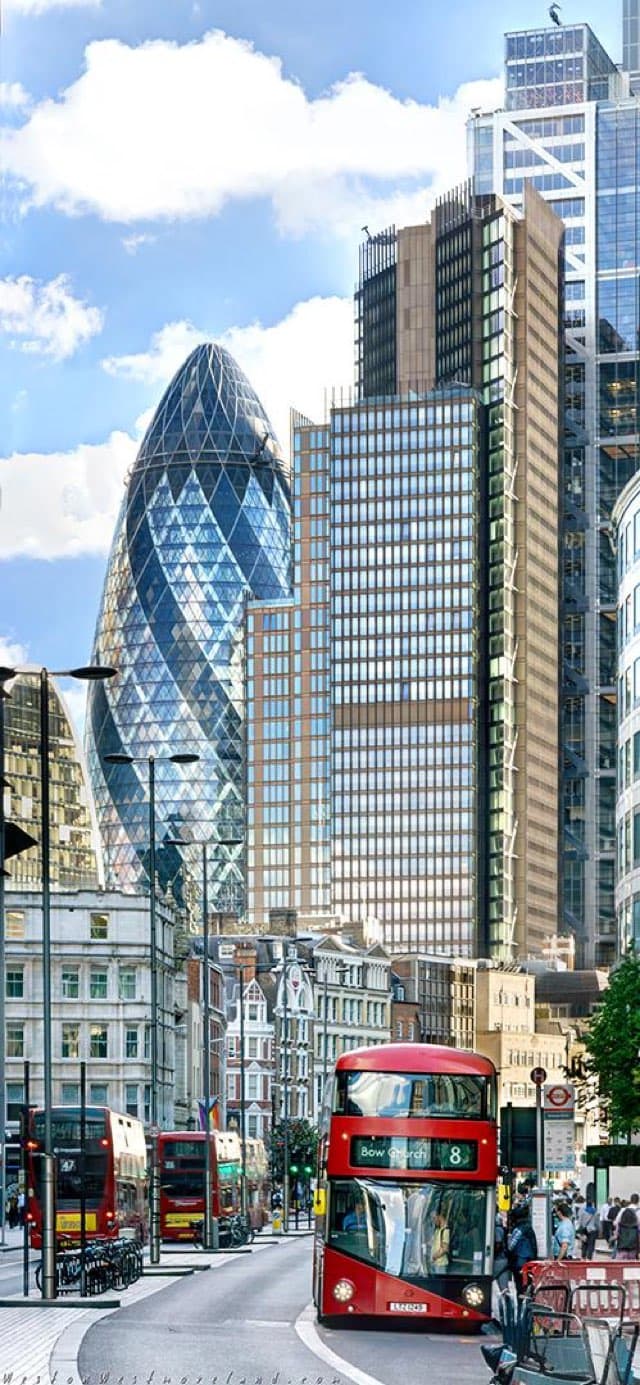
A London street with red double-decker buses and the Gherkin behind surrounding buildings
Known sample location: City of London, United Kingdom. This is a visual-clue walkthrough, not an AI result.

What you can check in the image

  1. The rounded tower with a diagonal facade is a distinctive landmark to compare with the Gherkin.
  2. The red double-decker buses support a London hypothesis, but do not identify this street on their own.
  3. The neighboring buildings and road alignment help test the viewpoint, rather than accepting the landmark alone.

Check the proposed location

Compare the tower, neighboring facades, and the direction of the street in reference imagery. A London estimate still needs a separate check of the exact camera position.

Try this sample in the upload tool

Explore more photo location examples

Price, and who uses it

What does Oceanir cost?

Oceanir is free to try in the browser with no credit card. Starter is $10 per month for 30 credits, including access to D3. Pro is $29 per month for 100 credits. Pro includes capped API access for individual development and low-volume internal use. Organizational, client-facing, batch, and production integrations require Enterprise. Enterprise plans are quoted per organization. Full plans: https://oceanir.ai/pricing

Can OSINT analysts geolocate a photo without EXIF?

Yes. Oceanir can suggest locations for photos and video frames without GPS or EXIF tags. Review the candidate locations and visible clues, then compare them with maps and independent sources. See the workflow: https://oceanir.ai/osint-image-geolocation

Visual Geolocation

No GPS needed.
No metadata needed.
AI reads the scene.

How it works

Have a photo with no location attached? Oceanir uses signs, roads, buildings, and terrain to suggest places you can investigate.

Depth 1

Why you're here

You might be checking a photo's caption, reviewing a claim, or trying to recognize a place. Start with the image and the question you need to answer.

Journalist

A video claims to show an event in a particular city. Check its visible landmarks and street layout against that location before publishing.

Reviewer

A claim includes a damage photo without location metadata. Check whether its surroundings fit the reported address.

Researcher

An archive photo has no location label. Use its buildings, signs, and landscape to look for possible places, then check historical sources.

Curious person

You want to recognize a place in a travel photo. Start with the visible landmarks and compare possible locations.

Shared photos and screenshots often have no location metadata. Visible details may still help you place the scene, though some images won't contain enough clues.

Depth 2

How to find where a photo was taken

Upload a clear image, compare the suggestions, and check the strongest match.

01

You upload the image

Upload a JPG, PNG, or WebP. For video, save a clear frame with visible surroundings and upload it as an image.

02

The model reads the scene

Oceanir doesn't need an exact copy of your photo to exist online. It reads the scene for clues such as road markings, signs, buildings, and vegetation, then compares them with geographic reference data.

Example: Left-hand traffic, yellow rear plates, and terraced brick houses could suggest the UK. None of those clues proves the location alone. Check them together, then compare the scene with reference imagery.

03

You verify the result

Review the candidate locations and their confidence scores. Compare the image with the map and available street-level imagery. Keep notes on what matches and what doesn't before accepting a location.

Image guidance

What kind of photos work best

Best results

  • +Outdoor scenes with visible streets or intersections
  • +Clear views of buildings, storefronts, or facades
  • +Visible street signs, shop names, or license plates
  • +Distinctive landmarks, bridges, or monuments
  • +Terrain with recognizable vegetation or coastline

Harder to locate

  • –Indoor photos with no windows or exterior context
  • –Nighttime shots with limited visible detail
  • –Heavily cropped or zoomed-in close-ups
  • –Portraits or selfies with blurred backgrounds
  • –Aerial drone shots from very high altitude
Pure visual analysis

No metadata required

Many social and messaging services remove location metadata from shared photos. A metadata reader can't recover coordinates that are no longer in the file.

Oceanir uses what's visible in the image: buildings, road markings, signs, terrain, and vegetation. It doesn't need GPS coordinates stored in the file.

You can try screenshots, re-saved photos, and images from messaging apps. The result depends on how many useful location clues remain visible.

Depth 3

When another method may help

Start with the original file if you have it. GPS tags can provide coordinates; an indexed copy may give you a caption or source. Visual analysis helps when those clues are missing.

To compare copies of an image with scene-based analysis, read our reverse image geolocation guide. To inspect the clues a tool can use, try the photo location finder.

What makes a photo harder to locate?

Reverse image search and geolocation can help with different parts of a search. Looking for a copy may reveal the source; examining the scene may suggest where it was taken.

A photo from WhatsApp with metadata stripped

What makes it difficult

Missing GPS tags leave a metadata reader with no coordinates.

Oceanir

Uses buildings, roads, and vegetation to suggest possible locations.

A screenshot of a Google Street View frame

What makes it difficult

A screenshot may still match reference imagery, but cropping can remove useful context.

Oceanir

Reads the visual content in the screenshot the same way it reads other scene media.

A generic suburban road with no landmarks

What makes it difficult

Similar roads appear in many places, so a visual match may be ambiguous.

Oceanir

Can use road markings and street details to suggest an area, but may not find an exact location.

A heavily compressed photo

What makes it difficult

Compression can make sign text and small details unreadable.

Oceanir

Can use details that remain visible. Heavy compression can still make the image impossible to place.

An indoor photo through a window

What makes it difficult

A generic interior may have few useful location clues.

Oceanir

Can examine buildings and terrain visible outside. A limited view may only support a broad estimate.

If a reverse image search doesn't find a useful match, try analyzing the scene itself. Oceanir can suggest locations from visible clues, though it may still be unable to place the photo.

Find where it was taken

Upload a photo to try a location estimate. No credit card required.

Upload your photo
FAQ

Common questions

Yes. Oceanir uses visible clues such as roads, signs, and buildings to estimate a location. It can analyze screenshots and shared photos even when GPS and EXIF tags are missing.

Results depend on the photo. Distinctive signs, buildings, and terrain give the model more to work with.

Clear outdoor scenes with roads, signs, storefronts, or distinctive terrain work best. Interiors, dark images, tight crops, and close-up portraits usually contain fewer useful location clues.

Free to try, no credit card required. The Surface scan on this page is free without signup. Workspace analyses use credits. Pro includes capped API access for individual development and low-volume internal use. Organizational, client-facing, batch, and production integrations require Enterprise. Paid plans include Starter for occasional D3, Pro for individual verification workflows, and sales-led Enterprise plans.

Yes. Save a clear frame from the video as a JPG, PNG, or WebP and upload it. Choose a frame that shows the surrounding scene.

No. A detailed analysis investigates more clues, but it can still be inconclusive. Generic interiors, dark scenes and tight crops may not contain enough evidence to establish an address. Check the free result and the example workflow before choosing a plan.

Yes. Signs, facades and roads can change after a reference image was captured. Check the imagery date and compare several stable features. A mismatch or missing imagery is a reason to keep the location unconfirmed.

Oceanir is free to try in the browser with no credit card. Starter is $10 per month for 30 credits, including access to D3. Pro is $29 per month for 100 credits. Pro includes capped API access for individual development and low-volume internal use. Organizational, client-facing, batch, and production integrations require Enterprise. Enterprise plans are quoted per organization. Full plans: https://oceanir.ai/pricing

Yes. Oceanir can suggest locations for photos and video frames without GPS or EXIF tags. Review the candidate locations and visible clues, then compare them with maps and independent sources. See the workflow: https://oceanir.ai/osint-image-geolocation